I want to first say thank you to Robin for
having me at her blog today! It is such an honor to be here!
{My sister and I share a blog called Beautiful Nest, where we show whatever we happen
to be up to at the moment! For me, this is often featuring the home
improvement projects that my husband and I do on our fixer-upper, as
well as posts on crafts and decorating!}
I have been noticing all of the
gorgeous and creative book wreaths in Blogland for some time now, and
thought it would be fun to somehow incorporate that idea into an ornament.
gorgeous and creative book wreaths in Blogland for some time now, and
thought it would be fun to somehow incorporate that idea into an ornament.
I also love paper birds and so
decided to make a paper bird, but add a twist to this idea by using
the pages of a book for the
body of the bird.
decided to make a paper bird, but add a twist to this idea by using
the pages of a book for the
body of the bird.
This Book and Doily Bird
Ornament is an inexpensive and fun
way to add a simple yet festive touch to your Christmas tree. And it is
not at all difficult to make, either!
Ornament is an inexpensive and fun
way to add a simple yet festive touch to your Christmas tree. And it is
not at all difficult to make, either!
What you'll need:
Bird and wing templates (see below)
Card stock, solid colored
Decorative card stock
A book {Dollar stores often sell
paperbacks that are just perfect for this}
paperbacks that are just perfect for this}
Miniature doilies
Buttons and decorative jewels
Felt
Twine
Glue gun, glue
sticks
sticks
School glue stick, such as Elmer's
{Along with these, you will also
need fabric and paper scissors as well as a hole punch.}
need fabric and paper scissors as well as a hole punch.}

Begin by printing out the bird and wing
patterns. They are not pictured to scale here, but if you save them to a
file and then print, they will
print to the correct size. (The birds are about five inches wide.) You
can trace these onto cardboard or card stock~ these will be your templates.
patterns. They are not pictured to scale here, but if you save them to a
file and then print, they will
print to the correct size. (The birds are about five inches wide.) You
can trace these onto cardboard or card stock~ these will be your templates.
Trace the bird template onto card
stock, and then do the same thing onto your book pages. I had to glue
two pages together to make it big enough for the bird, and most book
pages will probably be this way.
stock, and then do the same thing onto your book pages. I had to glue
two pages together to make it big enough for the bird, and most book
pages will probably be this way.
Glue the book page cut out onto the
card stock one.
card stock one.
If you used a hole punch for the
twine, make sure to do this part before going any further. It will be
too difficult to do it later.
twine, make sure to do this part before going any further. It will be
too difficult to do it later.
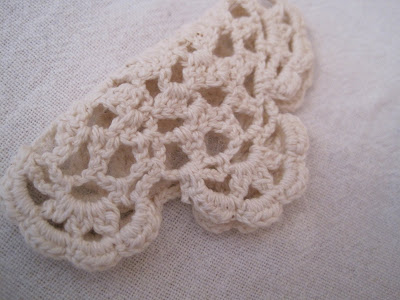
(You can find these miniature doilies at JoAnn
Fabrics, for 99 cents a piece.)
Fabrics, for 99 cents a piece.)
To give the doily
"wing" extra firmness, I used stitch witchery. If you haven't used this
before, don't worry! It is easy-peasy!
"wing" extra firmness, I used stitch witchery. If you haven't used this
before, don't worry! It is easy-peasy!
Cut a piece of stitch witchery
about half the size of your doily, making sure when you fold it, the
stitch witchery doesn't extend past the edges of the doily.
about half the size of your doily, making sure when you fold it, the
stitch witchery doesn't extend past the edges of the doily.
Now cover your folded doily with a
damp cloth and place hot iron onto it, holding it there for 10 seconds.
(Although I did notice cream doilies were a bit thicker than the white
ones, and they needed about 15 seconds to fuse.)
damp cloth and place hot iron onto it, holding it there for 10 seconds.
(Although I did notice cream doilies were a bit thicker than the white
ones, and they needed about 15 seconds to fuse.)
Using a glue gun, dot the folded doily with glue
and press onto the bird. You can glue the wing on however it looks best!
See how the wing covers the hole punch, so no one will know it's there?
and press onto the bird. You can glue the wing on however it looks best!
See how the wing covers the hole punch, so no one will know it's there?
Now if you want layered wings for extra
texture, trace the wing templates you like, and cut them out. You can
use book pages or felt for the extra wings...or anything you want! :)
Glue these onto the doily wing, and add your other embellishments~
buttons, sparkly gems, sequins...you name it!
texture, trace the wing templates you like, and cut them out. You can
use book pages or felt for the extra wings...or anything you want! :)
Glue these onto the doily wing, and add your other embellishments~
buttons, sparkly gems, sequins...you name it!
I also thought it would be fun to make birds out
of decorative card stock as well, with book page on the back of the
bird, and combine this with book page wings...Once you get going, the
possibilities are endless! You can mix it up however you like!
of decorative card stock as well, with book page on the back of the
bird, and combine this with book page wings...Once you get going, the
possibilities are endless! You can mix it up however you like!
Then the best part of all~ decorating your tree!
{Here is my little "kitchen tree"
with the birds!}
And that is all you need to know to make these bird ornaments! It has
been so fun to be here, and I hope you all have a wonderful Christmas! :)
Blessings,
Jenni
with the birds!}
And that is all you need to know to make these bird ornaments! It has
been so fun to be here, and I hope you all have a wonderful Christmas! :)
Blessings,
Jenni
Note From Robin: Thank you so much for guest blogging Jenni. The bird ornaments are adorable!
To visit Beautiful Nest click HERE. (So worth the click!)


I love birds and I love these! Thanks for sharing such a fun idea!!
ReplyDeleteI love this idea and I think I'm going to make some! Thanks so much!!
ReplyDeleteI just found your lovely blog nest and added myself as a follower. This ornament is so cute (love birds)!
ReplyDeleteI know it's a busy season but I'd like to invite you to come over and visit me sometime if you get a chance. Merry Christmas!
Those gals are so creative!! I love what Jenni did, it is so simple, yet so beautiful:)
ReplyDeleteprecious!
ReplyDeleteThank you, Robin, so much for letting me guest post on your blog today! It was fun! :)
ReplyDeleteI hope you have a beautiful day! :)
She worked hard and long on this. I even helped her some. Just so you know, I'm Jenni's son. :)
ReplyDeleteI loved this post and I have glad to have found your blog. I also love the header.
ReplyDeleteThose are so cute!
ReplyDeleteI love the bird ornaments Jenni. They look so pretty on your tree.
ReplyDeleteLindsay
x
Those are really pretty! I love that they're made out of pages of a book.
ReplyDeleteLovely tutorial, the doves are beautiful!I enjoyed my visit to your blog. Wishing you happiness, Katherine
ReplyDeleteP.S. I'm having a giveaway please stop by and enter :-)
Those are super cute. I think I could even handle making this one.
ReplyDeleteVery cute!
ReplyDelete