Here's a DIY tutorial on how to bleach and dye bottle brush trees...
The tree in this ornament is bright! I will show you how to dye the trees bright colors and also a faded more vintage color too.
First off you will need to get yourself some bottle brush trees-They come green and flocked. You can find them at Hobby Lobby, K-Mart, Michael's and Home Depot. I bought this 21 piece bag last year at Home depot for around $7. That was a really great deal that I have not seen offered this year-Thankfully I bought 4 bags!
Get a glass container... A small one will work if you are only doing a tree or two. I did a bunch of trees at one time so I used a real big vase. Fill it with water and add a little bleach. The more bleach you use the faster your trees will lose their green color. Make sure to cover your work surface and work in a well ventilated area-Use rubber gloves. Tongs are essential for moving the trees around.
This bleaching process can take from 2 minutes to 15 depending on how much bleach you use.
I like to rinse my trees in a vase of pure water after the bleaching process.
Here is one that stayed in till all the color was gone...It is completely dry and ready to dye.
To dye the trees I used alcohol inks. I bought mine at Ben Franklin's but I've seen ink sprays in many craft stores. Get yourself a small box and cover the bottom with a couple of paper towels. Stick your tree inside and spray away-Turning the tree to get it all covered. It doesn't take very much at all.
For bright trees: Spray and let them dry.
For a faded more vintage look: After spraying dip in water till you get the color you want-Let them dry.
Pictured above are trees sprayed and left as is -Very bright.
Below are trees that have been sprayed and instantly dipped in water-Faded.
Note: If your tree is still not as faded as you want dip it in the bleach water solution a couple of times.
Note: If your tree is still not as faded as you want dip it in the bleach water solution a couple of times.
Now that you have your trees the color that you want, get busy crafting!
I had a Christmas craft party and we put the trees in glass ornaments with snow...
Here's how:
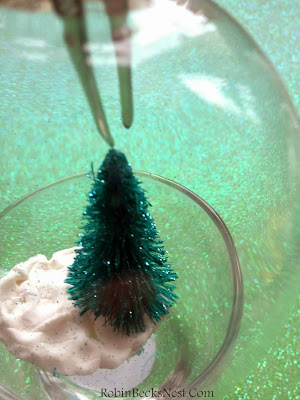
If kids are doing this I suggest using Crayola Model Magic clay as a base. Here I am using a drink stirrer to push the clay down. For adults you can use the clay or a thick permanent glue dot works great too. You will have to use wire cutters to cut the white base off the bottom of the tree so it will fit through the tiny top of the ornament.
Turn your tree upside down to get it into the ornament (not pictured)- Grab some long tweezers (Home Depot) and turn it around~ Push it into the clay where you want it.
Straighten the tree, add snow and put the top of the ornament back on.
I added a little glittered paper star to mine and a tag made of grosgrain ribbon. I actually stamped the "Merry Christmas" on the ribbon by using clear embossing ink. After stamping the words I added green glitter embossing powder and went over it very gently with my embossing heat tool.
Have fun!
Have fun!


Robin,
ReplyDeleteI didn't know that your blog has come to life again! The Bottle Brush Trees are so pretty. I like all the different colors, especially the red one with the snow. I love that ornament. I wish I would have known about this project -- me and the girls just had craft night, and would loved to have made these.
I hope you are enjoying this Christmas season, and so glad you did a post again.
Love,
~Sheri
Hi Sheri!!!
DeleteI left you a message on your blog!!!
Love,
Me ❤️
SO CUTE!!!!
ReplyDeleteThanks Tristan! So EASY too! 😀
DeleteRobin...I've missed seeing all of your neat crafts! Really love this one and I think it's easy enough for me to pull off. Thanks for the tutorial!
ReplyDeleteHi April! Thanks and your welcome for the tutorial. It is very easy and your girls would have fun making these too! Thanks for missing my crafts-I'm crazy about Christmas you know!
Deletelove the colors you used... I am def going to try this thanks.
ReplyDeleteThank you Yvonne! It's really a lot of fun-Merry Christmas!
Delete